¶ Introduction
With Transpas Online V7 you can enter orders, view and process documents and much more as you may have been used to in V6. However, V7 is suitable for mobile devices/touchscreens and works many times faster than V6.
¶ Logging in
Open the website https://v7.transpasonline.nl/?custom_url_part (custom_url_part is replaced by the unique name of the customer).

Log in with your personal username and password for Transpas Online.
¶ Interface
There are common elements in the interface that we explain below.
¶ Mainmenu
After logging in you will find the main menu on the left of the page. Here you will find all possible options depending on the modules that are active. Not all explanations below apply.
This bar is pinned by default on high-resolution devices. You can also hide the bar by clicking  . By moving the mouse to the left of the screen, the bar becomes visible again. (on mobile devices you do this by clicking
  ). To pin the bar again, click
  .
.
¶ Menu bar

| Icon | Description |
|---|---|
 |
Here you can filter the results that have been retrieved, you can search for multiple values using commas. This filter does not retrieve new results from the server |
 |
Create new record (order, relationship) |
 |
Delete record(s) |
 |
Copy record(s) |
 |
Refreshes the data |
 |
Data can be refreshed, downloaded and copied via this menu. You can also go to the first record of the results. Finally, you can reset the fields, this ensures that the columns are in the standard order and the width is adjusted to the retrieved information |
 |
Send an order |
 |
Shows actions specific to the selected screen |
 |
Various reports such as a CMR |
 |
For printing e.g. pallet labels |
With the toolbar
you can save the input and also delete it.
¶ User Fieldsettings (from version 7.1)
Starting from version 7.1, it is once again possible to determine which fields are visible in a grid or on a tab.
To customize fields in a grid right-click anywhere in the grid and select the option 
This will open a dialog where you can make fields invisible by unchecking the box next to the field.
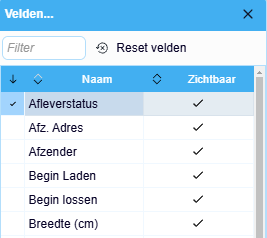
To customize fields on a tab left-click the gear icon located at the top right of the tab. 
This will open a dialog where you can make fields invisible by unchecking the box next to the field.
Both dialogs have a Reset Fields button, which resets all settings for that grid or dialog to the default configuration.
Some fields may have a lock icon next to them. These fields cannot be made invisible.
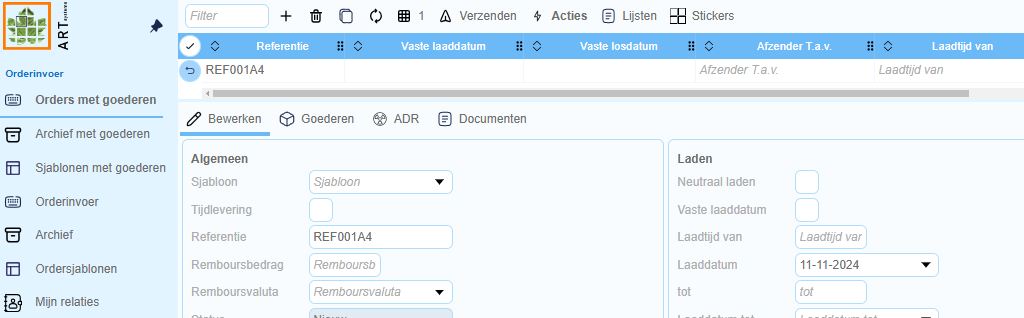
¶ Creating Orders
¶ Orders with goods
Orders are created in this menu, in this case with goods.
-
By clicking with the left mouse button on the button
a new order is created. -
Use the arrow keys on your keyboard to navigate through the input fields of the order.
-
This section consists of several tabs:
- Edit - Enter e.g. Name and address and reference details
- Goods - Adding goods/products
2.b. Goods items - - ADR - For adding products/substances that require an ADR certificate.
- Documents - For adding e.g. a transport order
-
The loading and unloading relation fields are lookup fields. When you open the lookup windows for these fields, you must enter the first three characters of the name of the relation you are looking for. Once you have done this, the lookup window will start looking for the relations that start with the three characters you entered.
-
If you want to enter a relation that you cannot find in the list of available relations, do not fill in the relation field and fill in the other fields (name, address, zip code, etc.). When you save the order, it is added to the list of available relations.
-
The loading and unloading location fields are automatically filled in by the combination of zip code and country.
-
If multiple results are found that meet the entered values of zip code and country, this will be displayed as “# places found”
-
After filling in the fields, you can click on the button  and the order will be saved. NB; The order has not yet been confirmed.
-
If a mistake has been made and you want to undo the new order before you want to save it, click with the left mouse button on the
 button.
 -
Once you have saved the order, you can continue creating the goods lines.
¶ Create goods lines

- To create goods lines, proceed as follows. Click with the left mouse button on the button at the bottom of the screen on the Goods tab
- Except for the “unit” field, all fields relating to the shipment must be completed. The “unit” field is a selection menu, which is pre-programmed to the customer's shipping pattern. By clicking the down arrow next to unit or pressing the space bar after the unit field has been selected, you will get the list of all selectable units.
- Once you have entered the goods line as desired, click on the button
 , you can also use arrow-up/arrow-down or shift+enter on your keyboard.
 - Multiple order lines can be entered per shipment. This works the same as indicated above.
- If you send stackable goods, you must indicate the number of items on the ground for pallet locations. Our system then calculates the corresponding loading meters itself.
- Once you have created and completed the order and goods lines as desired, you can now send the order. You can do this by clicking on
- You can also save the order you have created as a template so that you can choose it directly from the list of Order Templates in the future.
- You can do this by clicking on ->
 .
. - Even before you confirm the order, you have the option to print documents relating to the shipment(s). You do this by choosing or and choose the desired report or sticker.
Point of attention:
- Via the Template field it is possible to choose a “standard assignment” and have the fields filled in automatically from a created template. You do this by entering the first three characters of the name of the relations you are looking for in the template field.
¶ Declaration of ADR shipments
On the ADR tab, ADR data can be added to a goods line.
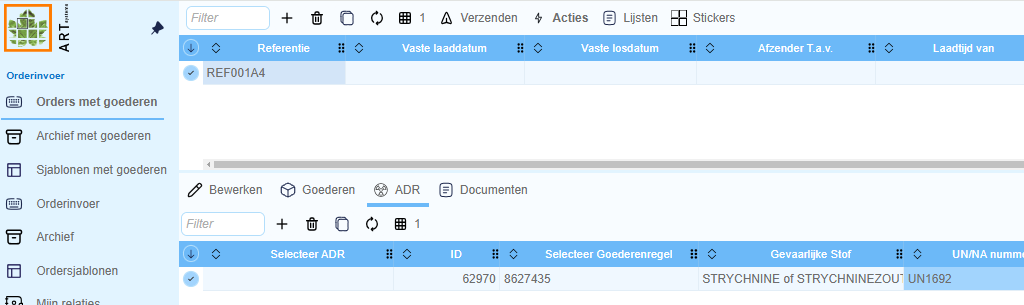
- Go to the ADR tab and press . In the Hazardous Material column, select the hazardous material in question. To be able to search quickly, it is advisable to do this using the UN number, also enter the letters UN before the number.
- Select if desired a goods line in the Select goods line column. (If no goods line is selected, the ADR applies to the entire shipment).
- Enter the weight of the hazardous material (required).
- Check Limited Quantities if applicable.
¶ Add documents
On the Documents tab you can add documents to the order, e.g.
- Go to the Documents tab and press .
- Choose a DocumentType.
- Select the document in question
- You can complete this document at Concers.
- Under Reference you can enter your own reference.
¶ Sending orders
After 1 or more orders have been created you can select them all via  and press to confirm them.

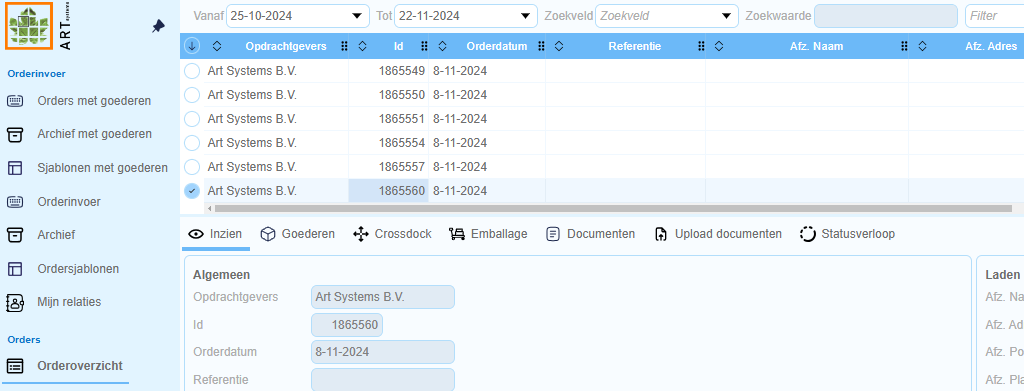
¶ Archive with goods
After you have sent and confirmed an order, it can be found in the “Archive with goods” screen. In the Archive screen you can find all orders that you have confirmed so far. You can filter by date via the fields above the list

The list of statuses includes:
Waiting → (Waiting to be imported)
Awaiting confirmation → (Order awaiting acceptance)
Accepted → (Order has been imported and accepted)
Rejected → (Order was rejected)
If you come across an order in the archive that has been entered incorrectly, you can reset it using followed by  to the Order Entry screen and then you can correct the error here and prepare it for import again.
You can also request a number of documents/reports here. In addition to standard documents as described above, the shipments can also be exported. This can be done by going to the orders that needs to be exported and clicking and then  . The results of the selection are saved in a *.csv file. Selecting orders can be done via
  or select everything via
¶ Templates with goods
Order templates with shipping dates can be created here. This is interesting if there are repetitive order flows.
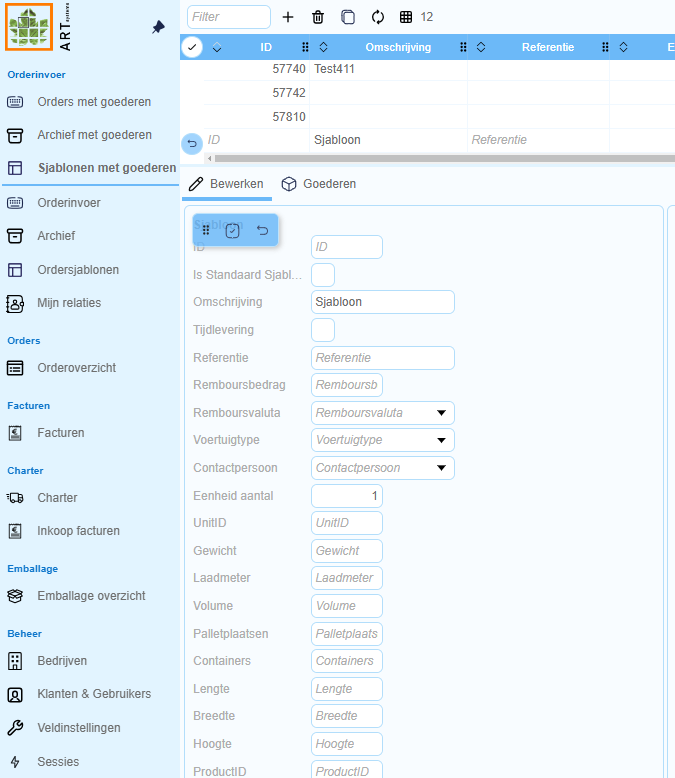
- Left-click on "Templates with goods" in the main menu. By clicking on the button a new template will open.
- The screen consists of two parts:
a. The top grid containing the existing templates and also an empty line if you create a new template.
b. At the bottom of the Edit tab (you can make changes both here and in the grid) and Goods here you can add goods to the template. - Start by giving the order template a name in the "Description" field so that it can be easily found.
- Enter the correct name and address and other relevant information in the template, and click with the left mouse button on the button
 .
. - On the Goods tab, the goods lines can be entered by clicking on the button .
From the Order with goods menu you can easily create a template of the order you are entering via

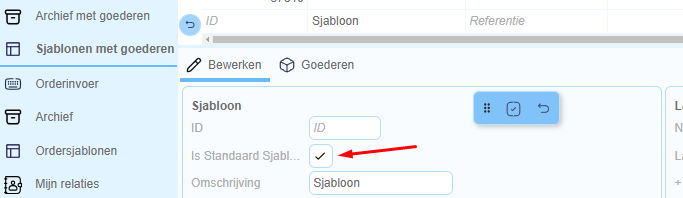
¶ Order template repetative orders
You can also set one template as the default for order entry. This template is automatically selected when creating a new order. You can set this via "Templates with goods", select the template that should be loaded by default and place a checkmark in the box next to "Is Standard Template".
¶ Order entry
Order entry works the same as Orders with goods, but you cannot add goods to this. For an explanation, follow the instruction Orders with goods.
¶ Archive
This Archive shows orders entered without goods, follow the instructions for explanationArchive with goods.
¶ Ordertemplates
Here you will find the order templates for orders without goods, follow the instructions for explanation Templates with goods.
¶ My Relations
Relations can be created under the My Relations menu.
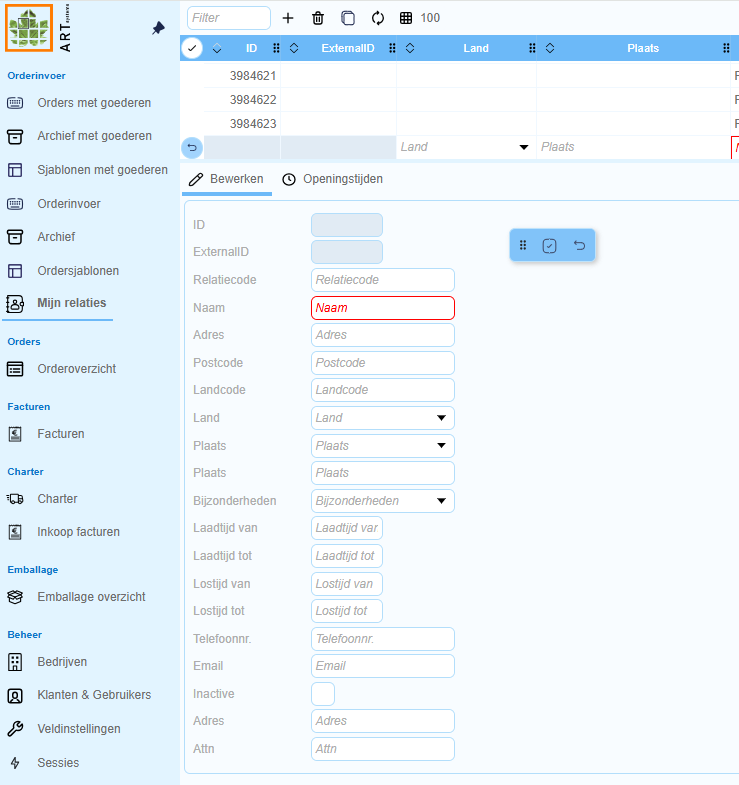
- Click with the left mouse button on “My relations” and then click on the button to create a new relation.
- The correct name and address details are entered here, after which the relation is saved by clicking with the left mouse button on the button.
- A relation can be deleted by left-clicking on the relation and then clicking the button.
- Relations are automatically saved after entering them once during order entry.
¶ Opening hours
Opening/closing times can be entered per relation on the Openinghours tab. In the Closed field you can place a check mark if the relation is closed all day. If, for example, the relation is closed on Monday morning, enter Monday for day, 12:00 for From and 17:00 for To.
With the toolbar
¶ Overview of transport orders
Here you will get an overview of the orders as they have been or are being executed for you. This overview contains both the orders created by you and by us.
¶ Options
At the bottom left you will find the user menu by clicking on your name.
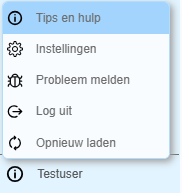
You can choose from:
- Tips and help - this link refers to our Wiki with all relevant information for TPO.
- Settings - here you can set the font size and some additional options.
- Report a problem - if you encounter a problem in TPO, you can report it to Art Systems via this option.
- Log out - this logs you out.
- Reload - if something is not working properly you may need to reload the application.